
Do you have a favorite font and want to use it more often without changing it while managing and editing Word documents? Here is how to change the default Word font on your PC (Windows and MacOS) right away.
What we cover
Change Default Font in Word
Changing the default font in Word on Windows is easy and involves a few steps. While the manually set default font can sometimes be reset, here we are with the solution to that as well. Before troubleshooting, let’s start with changing the font using the Word settings.
Note: Using the below three approaches will help you set a default font and prevent it from resetting. We have demonstrated the approaches below on Microsoft Word (Office 2007) for readers with older versions of Word.
However, don’t worry; the steps remain the same for newer versions, but there might arguably be a few negligible changes. Irrespective of the changes, the steps can be used as a reference without issues.
Changing Default Font in Word using Font Settings
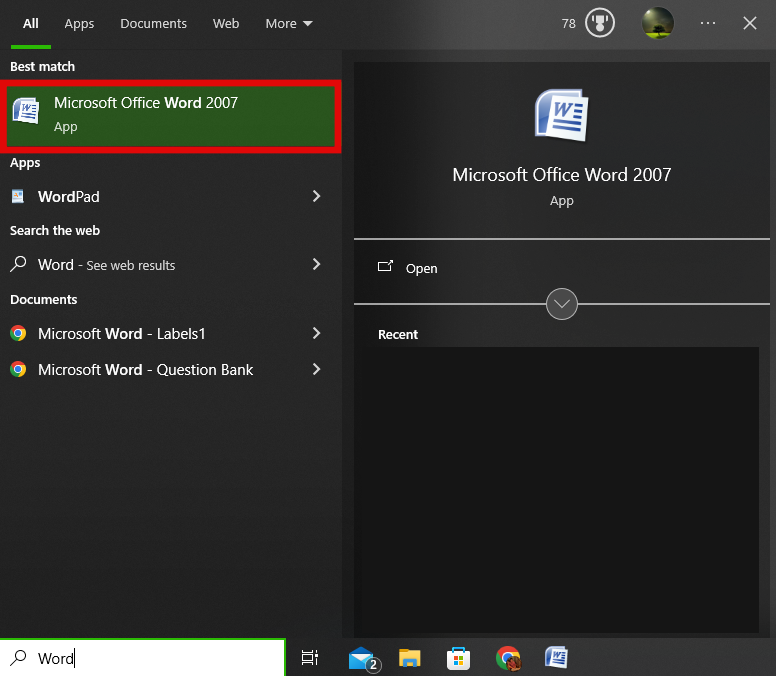
- Open Microsoft Word by pressing the Windows key, and in the search, type “Word.” Pick the first one from the results and open it by double-clicking it.
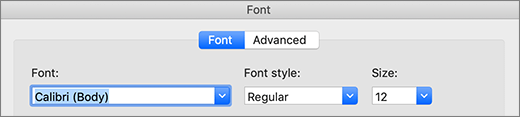
- After the Microsoft Word is loaded, press the key combination “Ctrl+D” to open Font settings.
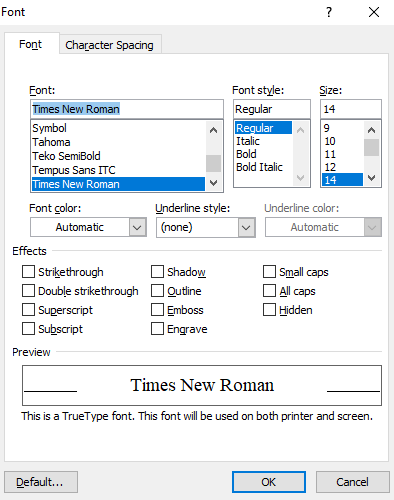
- Now, change the font settings and adjust crucial factors like “Font, Font Style, and Size.” If you’re interested, you can set “Font Color, Underline Style, and Effects” as well.
For demonstration, we have set the font as “Times New Roman,” font style as “Regular,” and size as “14.”
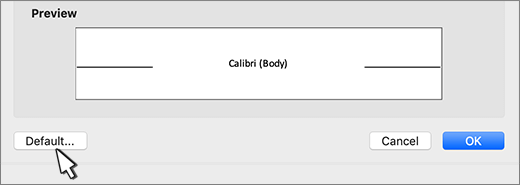
- After you have made changes in the Font settings, look for the option “Default” in the bottom left corner and click on it.
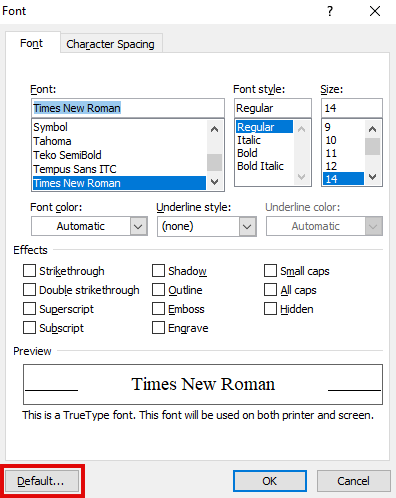
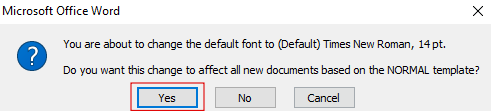
- On clicking the “Default button,” you will find a prompt stating the new changes will be applied to all documents. Click “Yes,” and you successfully set a default font.
Troubleshooting and Fixing Default Font that Resets
While the default font set stays unchanged on the current Word document throughout the creation and editing process, is it resetting after you open or restart a current/new document?
Worry not; this issue usually persists if the organization has set permission settings. Here is how you can try to bypass the restrictions and change the default font:
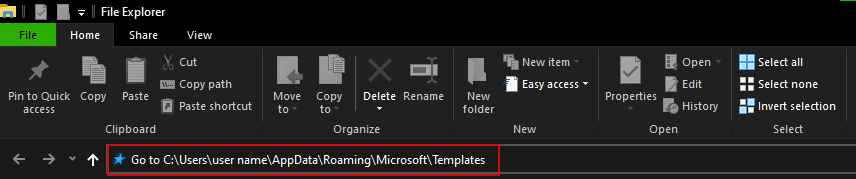
- Open the “File Explorer” on Windows by pressing “Windows
+E” key combinations. - In the path box, go to “C:\Users\user name\AppData\Roaming\Microsoft\Templates.” Replace the user name with yours before proceeding to the path.
- After navigating to the file path, you will find a file named “Normal.dotm.”
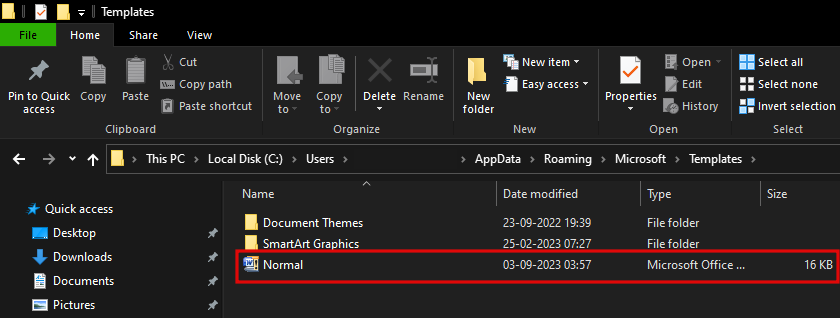
- Now, right-click on the ” Normal.dotm” file and click “Properties.”

- From the “Normal Properties” on the General tab, make sure Read-only isn’t checked. If it’s checked, uncheck it.

- Now navigate to the “Security” tab in the properties, and ensure that the “Write Permissions” are provided.

If you don’t have access to the “Read-only” box and cannot set the “Write Permissions,” contact the organization and ask them to give you access. Once done, follow the above steps, and the default you have set won’t change any more.
Turn Off Add-Ins to Prevent Resetting Default Font
Even though the Normal.dotm file properties are managed, if the default font set keeps changing, it must be the Add-Ins.
The Add-Ins added to Word can change the font and update the content. Here is how to turn off Add-ins to prevent resetting the default font set.
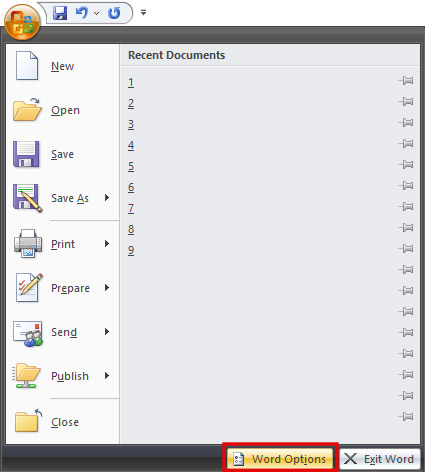
- Open Microsoft Word and click on the “Office Button,” If you’re using a new version of Office, you will find the “File” section on the top left of the toolbar.
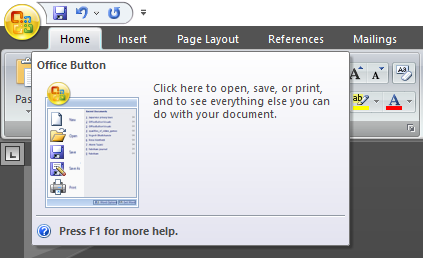
- After clicking on the Office Button, it opens a menu featuring several options. Look at the bottom right of the menu to find the “Word Options” button. Likewise, for the newer versions, you will also find “Options.”
- Look for the option “Add-Ins” from the Word Options and click on it to reveal all add-ins.
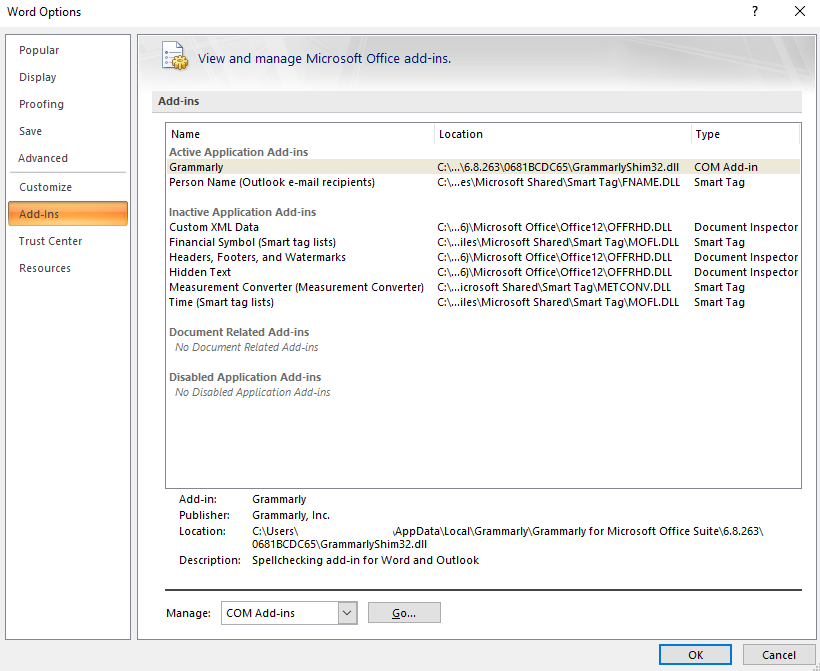
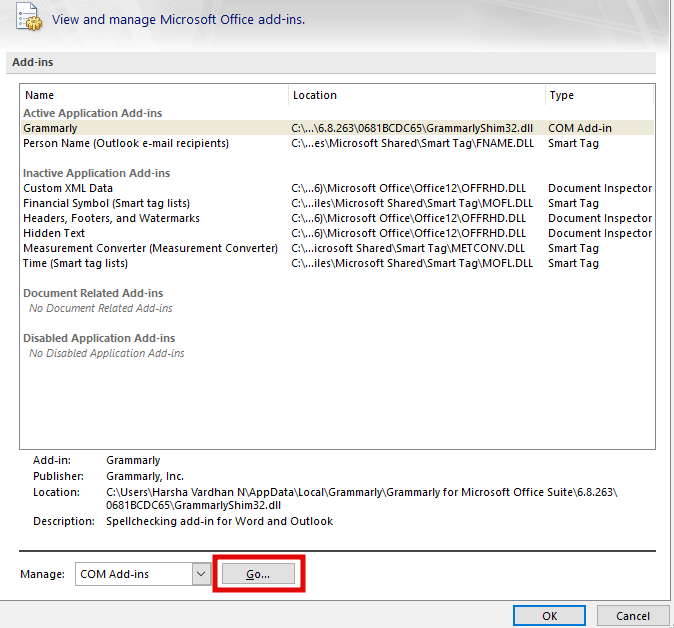
- In the Add-Ins window, look for the Add-Ins; if you find any suspicious, select it and click the “Go” button at the bottom.
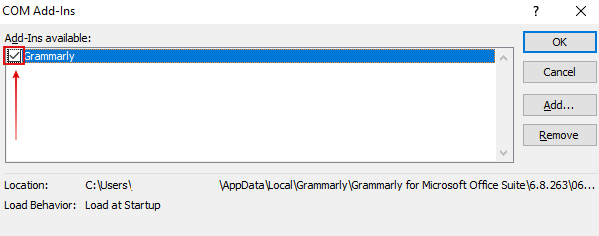
- Doing so opens a new window displaying the add-in you selected; you need to deselect the box beside the add-in name to disable it and click “OK” for the changes to appear.
Note: Don’t disable or remove Document Inspector type add-ins, as it can cause Word to malfunction.
[BONUS] Changing Default Font in Word on MacOS using Font Settings
The best part of Microsoft applications is the interface of its software and tools stays almost the same irrespective of the platform. Here is how to change the default font in Word on MacOS:
- Open the Microsoft Word on your MacOS PC from the Finder.
- After the Word is loaded, go to Format, navigate to Font, and click on it.
- Doing so opens the Font Settings and changes the Font, Font Style, Size, and other important factors, just like you did on Windows.
- Once you’re done making the changes, press the “Default” button at the bottom left of the font box, just like Windows, and the default font on Word is set.
Wrapping Up
Congratulations on changing the default font on Word (Windows and MacOS)!
If none of the above approaches have helped, restart your PC and try the same approaches again. However, if nothing works, try reinstalling Microsoft Office or the Word application, which sorts the issue.
Feel free to contact Microsoft Support if you need help with the above approaches.
FAQs
What to do if I cannot find the Normal.dotm file in the templates on Office 2007?
If you cannot find the Normal.dotm file in the templates on Office 2007, navigate to the path – C:\Users\user name\AppData\Roaming\Microsoft\Templates on File Explorer, and you will find the Normal.dotm file.
Can I delete Document Inspector type Add-Ins?
The Document Inspector type Add-Ins are crucial for the Word to work properly. If you accidentally deleted them, perform a “Repair” using the Setup file to add them back.
How do you change the default font in Excel?
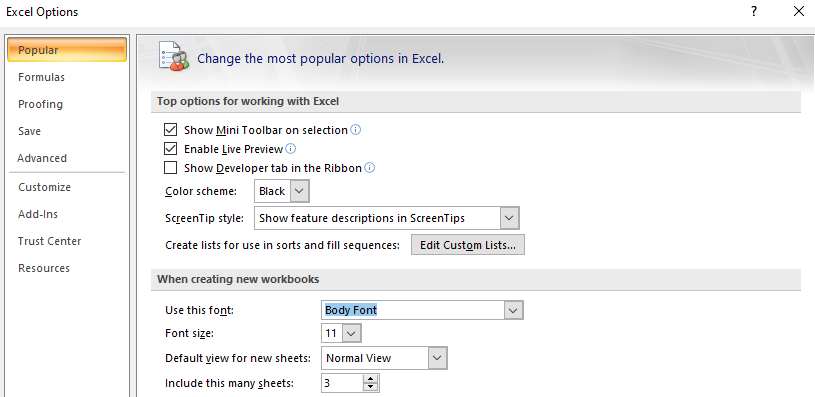
Open Excel Options, look for the option “Popular” or “General,” and click on it. Now navigate to the “When creating new workbooks” section, set the default font you like, and click “OK.”


