
Snipping Tool is arguably one of the most reliable tools offered by Windows, as it is easy to use, and most importantly, it does the snipping job perfectly without requiring the need for add-ons or installing third-party software.
Unlike other tools, the Snipping Tool doesn’t intervene with other tools when it has any issues. However, you might arguably find two outcomes, where it tends to crash or doesn’t load.
Multiple Effective Fixes for Snipping Tool Not Working
While most suggest rebooting the device to fix the Snipping Tool issues, you wouldn’t be here if that worked. To address all Snipping Tool issues effectively, we have provided multiple approaches featuring detailed steps that will help fix all its issues right away.
Reset the Snipping Tool App
Earlier, if there was any issue with the tools on older versions of Windows, the only left was to rely on “Troubleshoot Compatibility” or reinstall and install the app.
However, users are offered additional flexibility on Windows 10 and 11, where you can effectively reset any app or tool like you’re on an Android device and make it work better without issues using the below steps.
- Start by pressing the Windows button to open the Start and click on Gear Icon to open Settings.

- Once you’re in Settings, navigate to Apps and click on it.
- Now navigate to Installed Apps and scroll down to find Snipping Tool; click on it to reveal Advanced options.
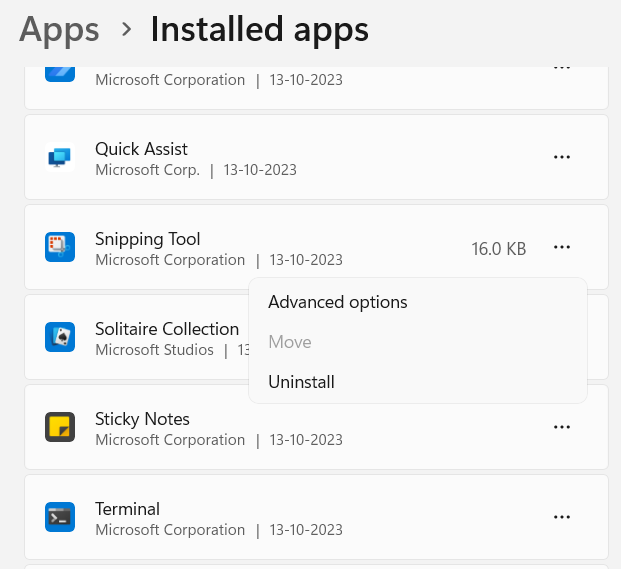
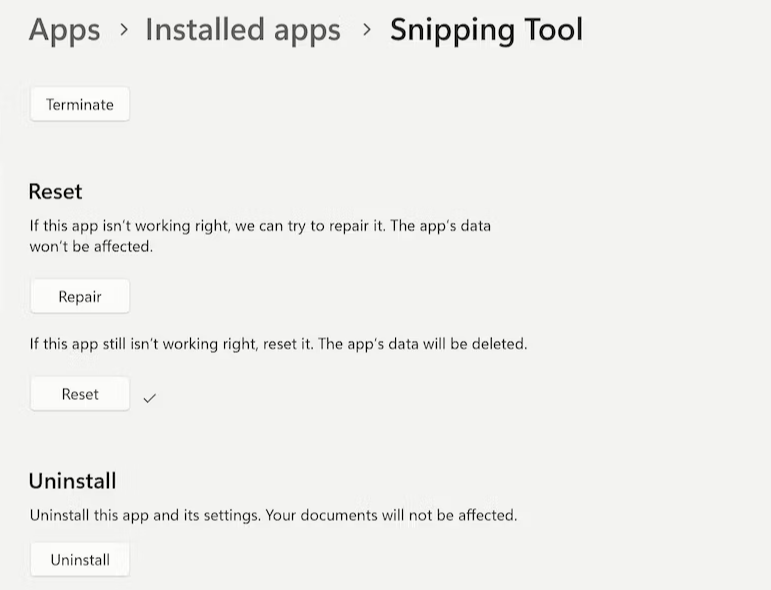
- After you click on Advanced options, you will find multiple sections. Now, scroll down to the Reset section and click on the Reset button.
Note: While this approach works on most tools and apps, the Snipping tool isn’t listed in the list of apps on Windows 10. Hence, the steps above are for users experiencing issues with the Snipping Tool on Windows 11.
Enable Snipping Tool in Background Apps
As the Snipping Tool is mostly left in the background and is used when needed, if it is provided access to run in the background, you might notice it closing automatically after a certain period.
While most consider this as an issue with Snipping Tool, enabling it Background Apps can help fix the issue, and here are the steps for it:
- Refer to Steps 1-2 from the above approach to open Settings and then Apps.
- Now, look for Installed Apps and click on it. Once done, swipe down until you find the Snipping Tool.
- Find the vertical three dots to the right and click on it to reveal a few options, from which choose Advanced options.
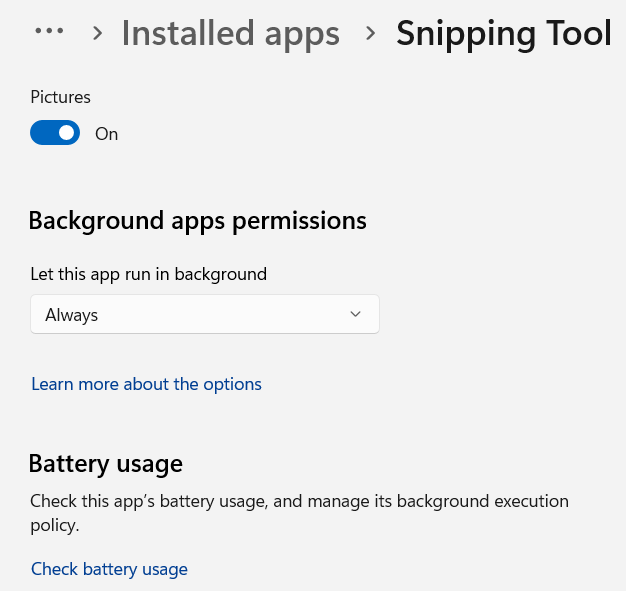
- Now scroll down until you find the Background apps permissions section. Look for the drop-down under Let this app run in the background and click on Always.
Note: Like the above approach, unfortunately, Snipping Tool isn’t listed in the background app permissions list on Windows 10. Hence, the above steps are for Windows 11 users.
Uninstall Third-party Apps
Several applications can interfere with the normal functioning of the Snipping Tool, potentially causing malfunctions. Before we discuss the steps for uninstalling such third-party apps, if you’re not sure about which apps to uninstall, here are a few you need to consider:
- Antivirus or Screen Recording Software
- Third-party clipboard managers
- Third-Party Display Enhancement Tools
- Virtual Machines or Remote Desktop Software
If you find any app suspicious and fall in the list of above-mentioned software, follow the steps below to uninstall them:
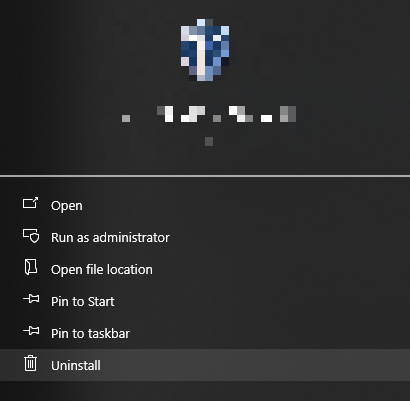
- Start by pressing the Start button, and in the search, type the name of the app.
- Doing so, you will find several options on the right, from which click on Uninstall.
Update Graphic Drivers
Outdated or incompatible graphic drivers may lead to conflicts, making it difficult for the Snipping Tool to capture screens or function correctly. By updating the graphic drivers through the below steps, you ensure that the Snipping Tool works well without issues.
- Start by pressing the Windows + X keys together to open the WinX menu or Power User menu. Now, from the list of options, look for Device Manager and click on it.
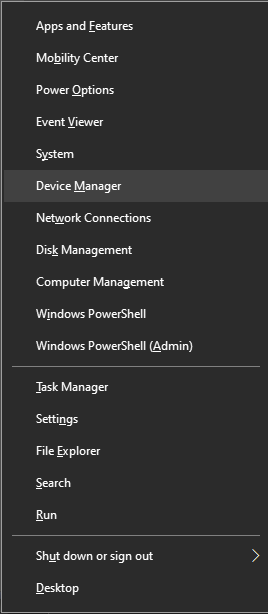
- Once you’re in Device Manager, look for the section – Display Adapters and click on it to reveal the graphic card.
- Now, select the graphic card that you believe is acting up or has outdated drivers.
- Once selected, right-click on it, and from the options, click on Update driver and proceed with the driver updation process.

Check for Windows Update
Usually, apps tend to malfunction when there is an issue with the operating system due to incompatibility. While this happens because of the bugs underlying the specific release, updating the OS using the below steps can help the Snipping Tool work again:
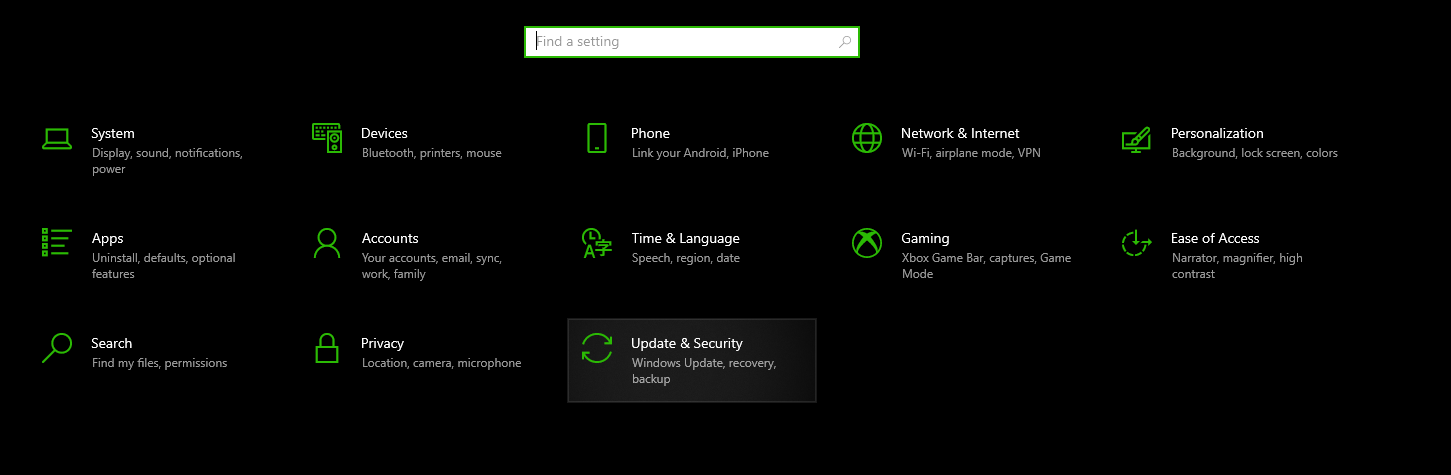
- Start by opening Settings by pressing the Windows + I key combination.
- After the settings are loaded, look for Update and Security and click on it.
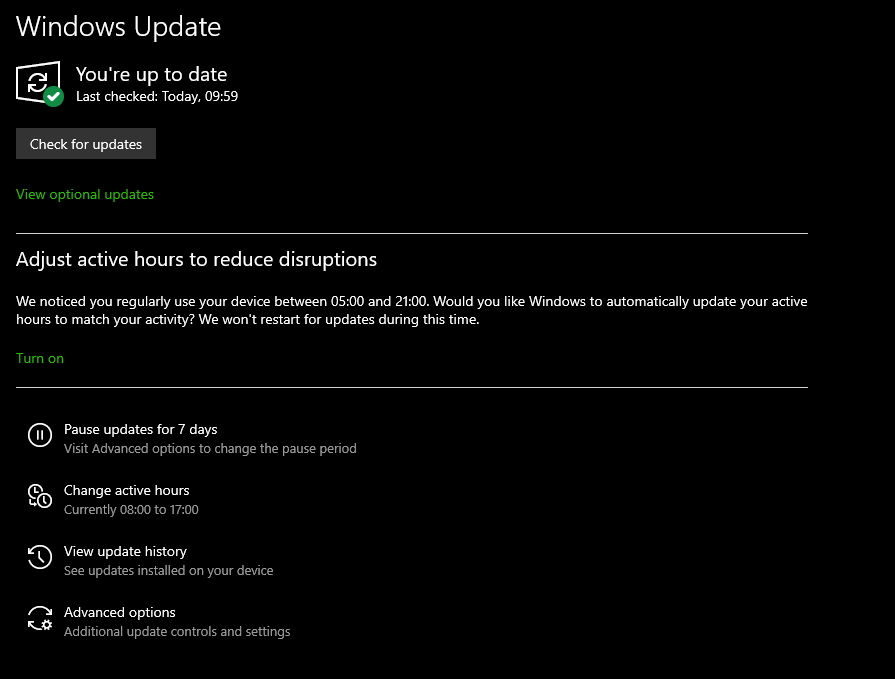
- If you have turned on Automatic Updates, you will find updates listed if available.
- However, if you have turned on or want to cross-check, click on Check for Updates, and if any updates appear, click on Download and Install.
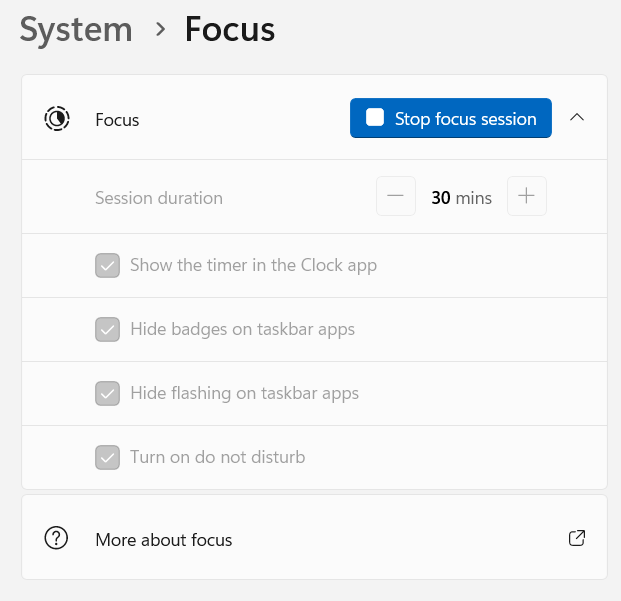
Turn Off Focus Mode
The Focus Mode is introduced in Windows 11, and as the name suggests, it blocks certain services, apps, and notifications until the set timer runs out. If you have been using Focus mode, here are steps to disable it:
- Press the Windows Key to open Start, look for the Gear icon, and click on it to open Settings.
- On the left-hand quick access menu, click on System and swipe down to find Focus.
- Now click on it, and you will find a button – Stop focus session; click on it and try to open the Snipping Tool again.
Perform System Scan through the Scannow Tool
While the above fixes should arguably fix all the issues related to the Snipping tool, if the issue persists, try running the Scannow Tool, as it helps repair and restore the damaged files that cause it to malfunction:
- Press the Windows button, and in the search bar, type Command prompt.
- After the Command Prompt is displayed, look on the right for options. Now, click on Run as Administrator.
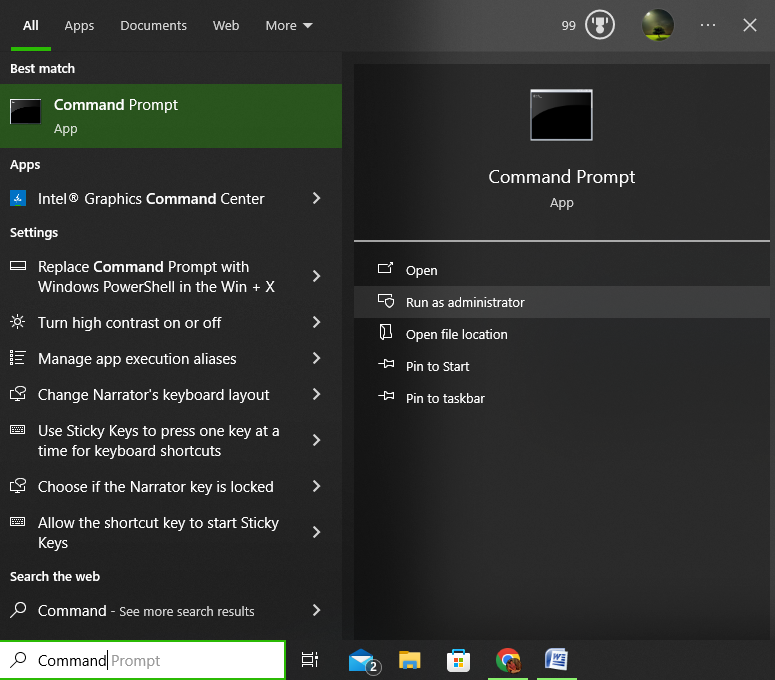
- After the command prompt is loaded with administrator privileges, enter the below command.
sfc /scannow

- Once the entire process is finished, type the below command to open the Snipping Tool.
snippingtool.exe
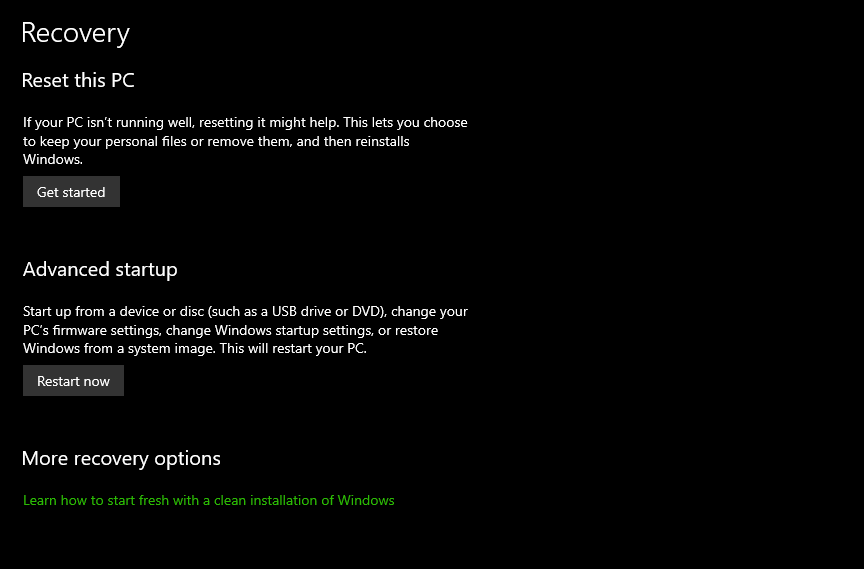
Reset your PC
If none of the above approaches work, the final approach left was to reset the PC. Doing so, everything is set back to default, and any underlying issues with the operating system or system apps get fixed. Follow the steps below to reset the PC:
- Press the Windows button, and in the search, type Reset this PC and click on the first result.

- Doing so, opens the Recovery settings, and from the different sections, look for Reset this PC, and click on the Get Started button associated with it.
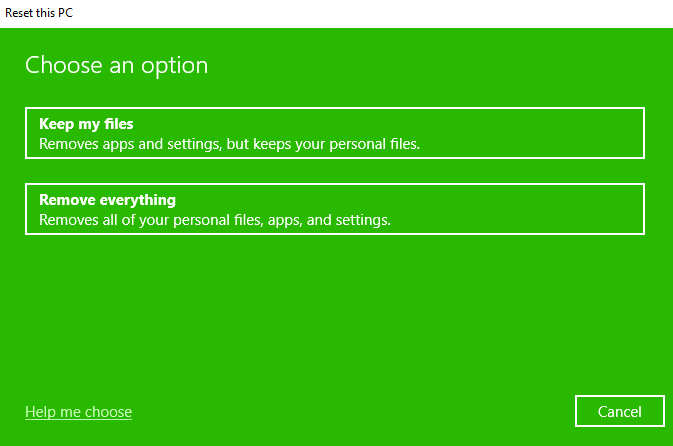
- Doing so opens a new window, where you’re offered two options. If you haven’t backed up your data, choose the first one [Keep my files]. However, we suggest performing a backup and going with the second option [Remove Everything] for a complete reset.
Wrapping Up
We have addressed every possible fix that would help in fixing the Snipping Tool. While you might find a few approaches demonstrated on Windows 11 and the rest on Windows 10, it is done to address the issue effectively, as a few approaches are restricted to a specific version of Windows.
If none of the above approaches work, we advise you to go with the fresh installation, as it will definitely fix the room, and there won’t be any room for any issues with apps.


