If you’re a Mac user running macOS Ventura, you have the flexibility to customize where your screenshots are saved. By default, macOS stores screenshots on your desktop, which can quickly clutter your workspace.
However, with just a few simple steps, you can change the location where these screenshots are stored, allowing for a more organized and clutter-free desktop.
What we cover
Step-by-Step Guide to Change Screenshot Location on a Mac
Follow these steps to change where screenshots are saved on your Mac:
Open Screenshot Capture
To begin, press Command + Shift + 5. This key combination will bring up the screenshot capture menu, which is a versatile tool for taking screenshots with various options.
Access the Screenshot Options
After pressing the key combination mentioned above, you’ll see a toolbar at the bottom of the screen.
Look to the right side of this toolbar and click on the “Options” button, which looks like a gear icon. This will open up a menu with several customization choices.
Choose a Location: In the “Options” menu, you’ll find a section labeled “Save to.” Here, you have several options to choose from:
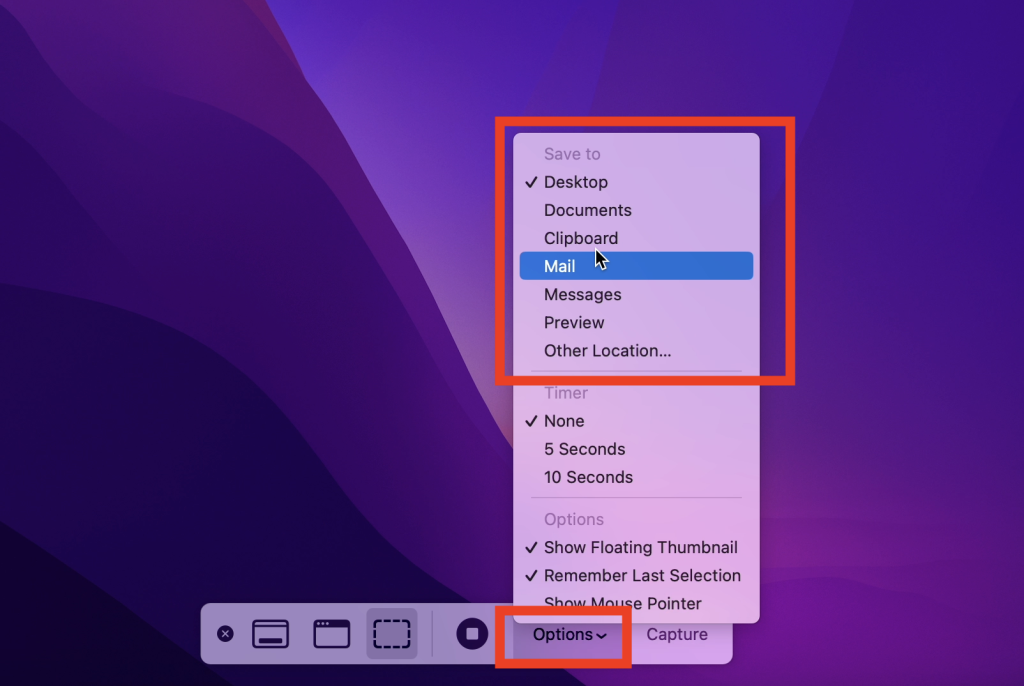
- Desktop: This is the default location, where screenshots are saved directly to your desktop.
- Documents: Selecting this option will save your screenshots in the “Documents” folder.
- Clipboard: If you choose this option, the screenshots will be copied to your clipboard for easy pasting into other applications.
- Mail: Screenshots can be sent directly to the Mail app.
- Messages: Selecting this option sends the screenshot to the Messages app.
- Preview: Screenshots will be opened in the Preview app.
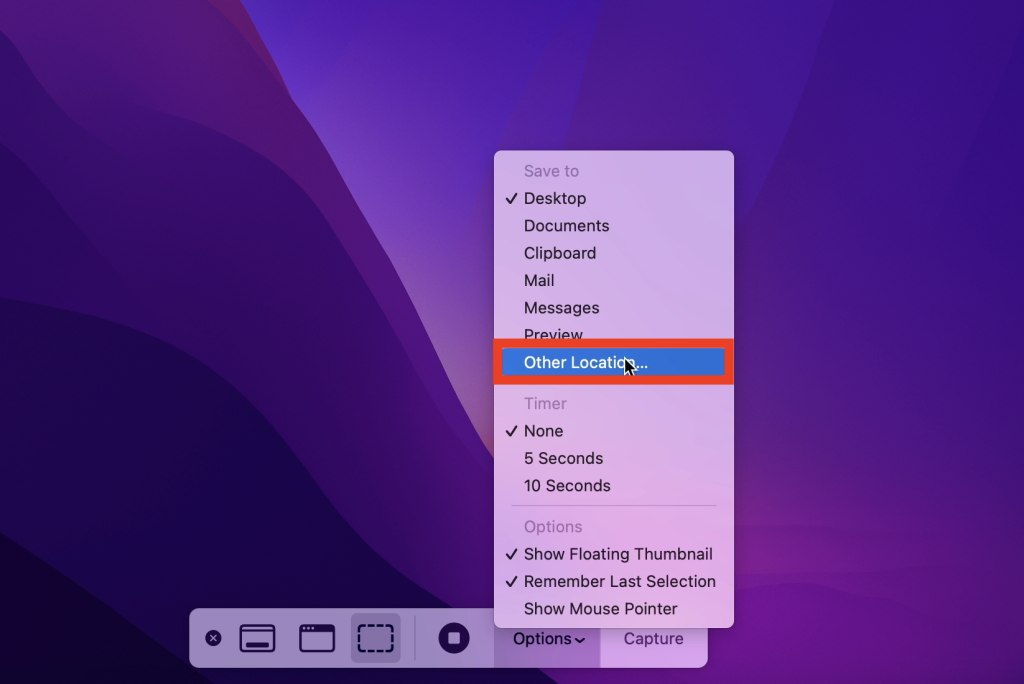
Choose “Other Location“: If none of the default options suit your preference and you want to specify a custom location, select “Other Location.” This option allows you to navigate to a folder of your choice or create a new one.
Navigate to a Custom Folder: If you choose “Other Location,” a window will open, enabling you to browse your file system. You can navigate to any existing folder or create a new one by clicking the “New Folder” button and naming it.
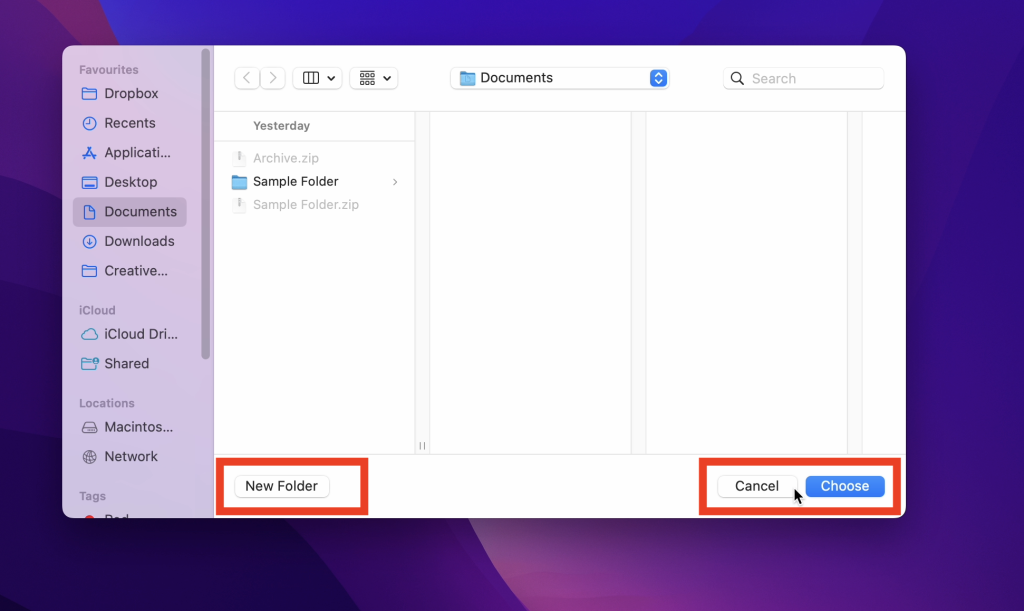
Confirm Your Choice: Once you’ve selected or created your desired location, it will be displayed in the “Options” menu. This is where your screenshots will be saved from now on until you decide to change the location again.
Close the Screenshot Capture Menu: To finish and save your changes, simply tap the Esc key on your keyboard. This will close the screenshot capture menu.
Also Read: How to copy and paste on Mac?
Benefits of Customizing Screenshot Locations
Changing the location where your screenshots are saved offers several benefits:
- Organization: Customizing the location allows you to keep your screenshots in a designated folder, reducing desktop clutter and making it easier to locate specific screenshots.
- Privacy: If your desktop is visible to others, changing the screenshot location can help you keep sensitive information hidden.
- Workflow Efficiency: You can streamline your workflow by automatically saving screenshots to folders relevant to specific projects or tasks.
- Accessibility: Storing screenshots in a location other than the desktop can make them more accessible for sharing, editing, or referencing in various applications.
For instance, you might choose to keep all your screenshots neatly organized in a folder called “Screenshots” within your “Desktop” folder. This approach ensures that your screenshots are easily accessible yet well-organized.
In conclusion, customizing the location where your screenshots are saved on a Mac is a simple yet powerful feature that can enhance your productivity and organization. By following the steps outlined in this guide, you can tailor your screenshot management to suit your specific needs and preferences, resulting in a more efficient and clutter-free digital workspace.
FAQs
How can I revert to the default screenshot location on my Mac?
To revert to the default screenshot location (which is your desktop), follow these steps:
Press Command + Shift + 5 to open the screenshot capture menu.
Click on “Options.”
Under the “Save to” section, select “Desktop.”
Close the screenshot capture menu by tapping the Esc key.
Your screenshots will now be saved to the desktop again.
Can I change the screenshot location for specific types of screenshots, like snips or full-screen captures?
Yes, you can change the screenshot location for different types of captures by customizing the save location in the “Options” menu. For instance, you can set one location for full-screen captures and another for snips or specific capture types.
What happens if I change the screenshot location but delete the custom folder?
If you change the screenshot location to a custom folder and later delete that folder, macOS will revert to the default location (desktop) for saving screenshots. Make sure to choose a location that you won’t accidentally delete.
Can I change the screenshot location for existing screenshots?
No, changing the screenshot location in the macOS settings will only affect future screenshots. Existing screenshots will remain in their original locations. If you want to move existing screenshots, you’ll need to do so manually by dragging and dropping them into your desired folder.
Are there any limitations to changing the screenshot location on a Mac?
While you have the flexibility to choose where your screenshots are saved, keep in mind that you should select a location that is easily accessible and not too deeply nested within your file system. Extremely long file paths or obscure locations may make it challenging to find your screenshots later. Additionally, ensure that the chosen folder has sufficient storage space to accommodate your screenshots.


