The ability to screen record on iPhone and share it can be immensely helpful for a multitude of purposes in today’s digital era. There are a number of ways in which screen recording can assist you, including creating tutorials, showcasing your gaming prowess, troubleshooting problems, and simply sharing amusing moments with friends.
This article will serve as a comprehensive guide on how to screen record using iPhone using different methods and you’ll also be given some bonus tips, but before let us see how to turn on the screen recording feature on your iPhone.
Method 1: Using the Built-In Screen Recording Feature
Apple has made it easy for iPhone users to record their screens without downloading third-party apps since the release of iOS 11. Here’s how to do it:
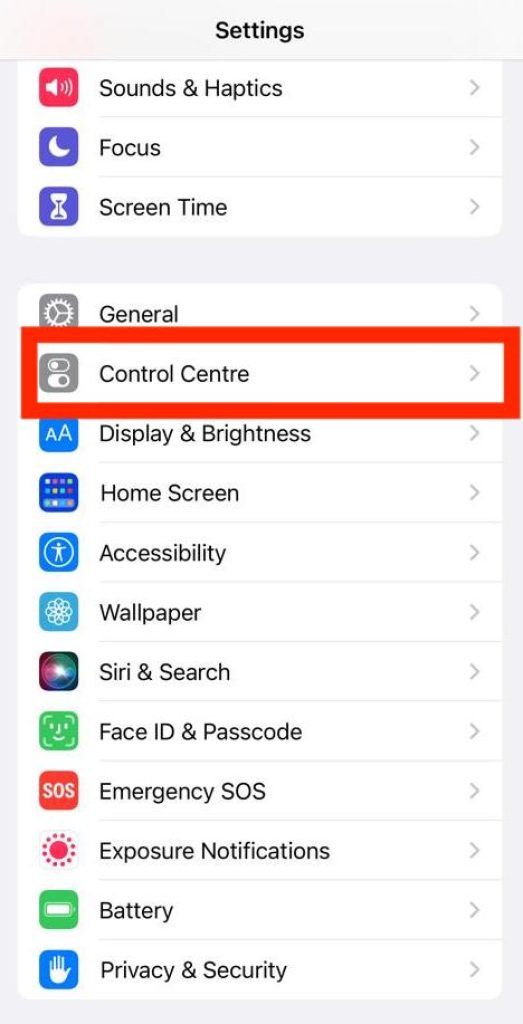
Enable Screen Recording: In order to enable the screen recording feature, you have to click open the “Settings” app on your iPhone and tap on “Control Center.”
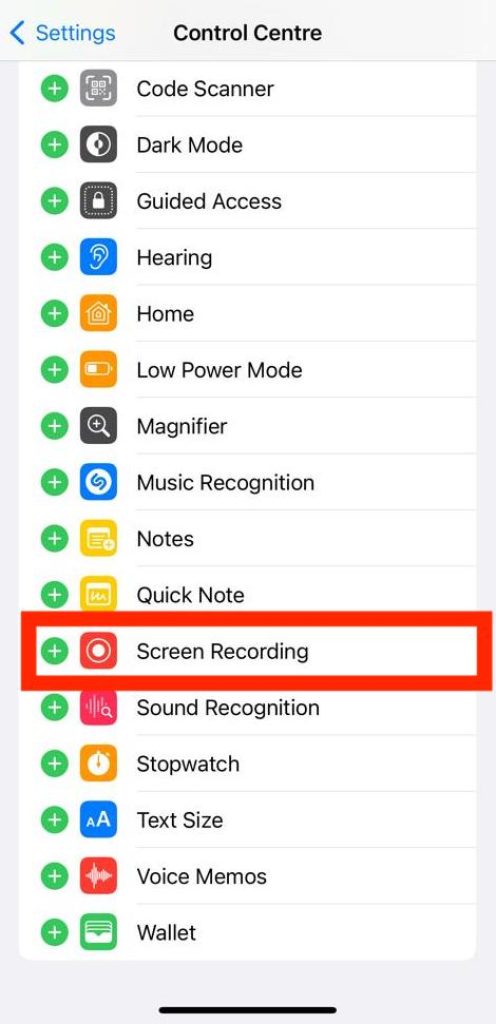
Then, you need to select “Customize Controls” and add “Screen Recording” to your Control Center by tapping the green ( + ) icon.
Access Control Center: To access the Control Center, you need to make a swipe down from the top right corner of the screen or you can also do it by swiping up from the bottom of the screen for the most recent models.
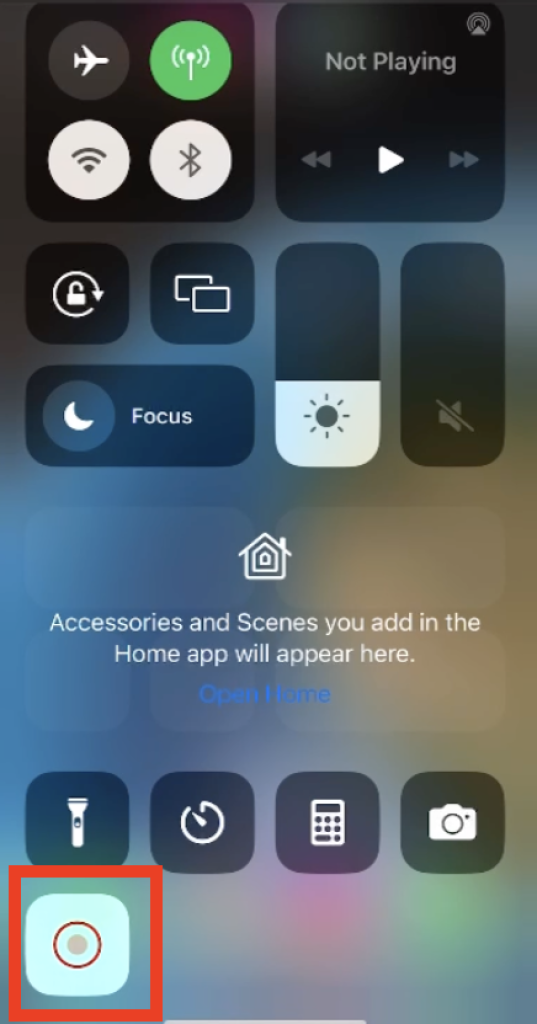
Start Recording: Go to the Control Center and look for the circular button with a white dot inside. This symbol represents “Screen Recording”. Once you’ve found it, tap on it to start the recording.
Confirmation Prompt: You will be prompted with a confirmation message and a countdown of three seconds before the recording begins. If you want to add audio to your recording, long-press the screen recording icon and enable audio recording. Then, tap the microphone icon to begin recording your voice.
Record Your Screen: Once recording begins, your screen will be captured exactly as you navigate and interact with it. You’ll see a red status bar at the top of the screen indicating the recording is in progress.
Stop Recording: To stop the recording, you have to tap on the red-colored status bar or you can return to the Control Center and again tap on the screen recording icon. You must confirm your action when prompted.
Access Your Recording: Your screen recording is automatically saved in the Photos app under “Videos.”
Method 2: Screen Recording with VoiceOver
iOS also has the option to create screen recordings with voiceover narration.
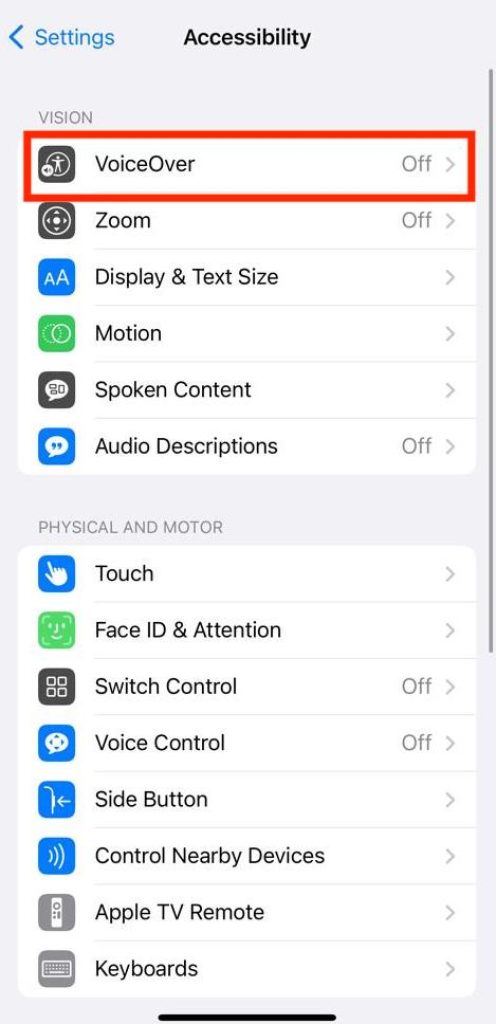
Enable VoiceOver: For this, go to “Settings” and then select “Accessibility.” From there, you can turn on the feature.
Start Screen Recording: Follow the same steps as mentioned in Method 1, but ensure VoiceOver is enabled before you start recording.
Record Your Voice: VoiceOver will read out the content of your screen as you use it, and this will be recorded along with the screen video.
Also read: How to change font size on an iPhone
Method 3: Screen Recording in the Control Center with Sound
Screen recording doesn’t by default record external audio, such as songs or app sounds. You can activate this function, though:
- Access Control Center: To access the Control Center, swipe down or up.
- Force Press or Long-Press Screen Recording: Choose whether to long-press (iPhone SE 2nd generation and after) or force-press (iPhone 6s and later) the screen recording icon.
- Select Audio Source: When a menu appears, you can choose to enable “Microphone Audio.” To allow the recording of external audio, tap it.
- Record: Follow the usual screen recording steps. Your iPhone will now capture both the screen and external audio.
Method 4: Record Specific Portions of the Screen
iOS has you covered if you merely want to record a section of your screen:
- Access Control Center: Open the Control Center as usual.
- Long-Press or Force-Press Screen Recording: Again, depending on your iPhone model, long-press or force-press the screen recording icon.
- Select Recording Area: Tap on “Start Recording” in the menu that appears.
- Begin Recording: Your screen recording will start, but this time, you can drag the recording frame to capture only the portion of the screen you want to record.
- Finish Recording: Stop the recording using the red status bar or the Control Center as before.
Steps to Access and Edit Your Screen Capture
Wish to edit a recent video and make it stand out? It can be done using the Photos app on your iPhone. From there the video can be edited on the iPhone with the help of various filters, cropping out the beginning or end and saving it as a new clip.
- Go to the camera roll of your iPhone, navigate to the photos app, and then tap on the video. Select Edit situated on the top right of the screen.
- If you wish to view the visual history of the video, it is present at the bottom of the screen. In order to trim the video, tap on the arrow next to the play button and drag it to trim the beginning of the video. To trim the end, simply tap and drag the arrow on the opposite side to the left.
- The updated version can be viewed by clicking on the Play Button and the arrows can be repeatedly readjusted to your liking.
- The buttons that are used to change the filters are the same ones that are needed to edit a photo.
- If you want to save the altered video, just tap on Done and save the clip under New Clip.


